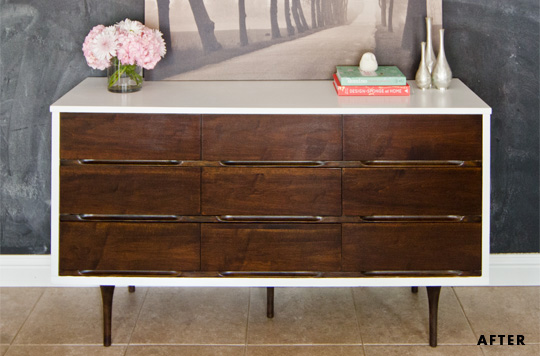
If you follow us on facebook, you already heard/saw that I was on Down and Dirty with Frank Fontana Wednesday. The producer Andy found the shameful post about our dresser mess and asked me to come on the show to talk about it in their segment DIY Disasters.
You can listen to my babbling (yes I was completely nervous) here. I begin said babbling 43 minutes into the show. You can also watch it here in case you want to see the pictures. The video will start at the beginning of my segment. Despite being a nervous wreck, I am glad I got to share half of the story with our dresser (read the other half here).
It got me thinking about working with veneer and refinishing furniture in general. I thought I’d make a list of the reasons why (and possibly why not) to refinish veneer furniture. So there goes…
1. Veneer furniture is considerably cheaper than solid wood.
Although the craigslist ad said our piece was solid wood, it wasn’t. We didn’t know until we got there and honestly it was too cheap for us to care ($150 for 2 dressers). Painting veneer is not different from painting solid wood. You can repair chips with filler and not tell a difference (if you do your repairs correctly). Staining is a little different. Luckily the repairs to stained part of our dresser were not extensive, so it isn’t noticeable. Also it’s way cheaper than buying new even with supplies.
2. If the veneer furniture is just too darn sexy.

We don’t get a ton of mid century modern pieces in the south. (Thank you west coast hoarders.) Our dresser has clean lines and sexy legs that made it impossible to pass up especially at the price. If you love the look, don’t pass it up just because it is veneer.
3. It’s not impossible (or even difficult) to refinish, it just presents some new challenges.
If I would have stained furniture before, I would have avoid the 2 huge mistakes (stripper and sticky stain) that I made. Those mistakes happened not because it was a veneer piece, but because I followed advise I shouldn’t have. Moral: Don’t use stripper and let the stain dry completely…meaning it shouldn’t be sticky before you apply more stain or poly. The new challenges are simply that you have a limited amount of wood surface you can sand into. You have to sand the previous finish off and have enough veneer left to absorb the stain you will apply. It sounds scarier than it actually is. I had to sand the drawers twice, and it didn’t wind up being a big deal except the time I’d lost.
4. If things get crazy, have a plan B.
Frank gave a plan B which was painting the drawers and doing a faux wood finish on them. Painting the drawers was not out of the question. If things wouldn’t have turned around on my second attempt, we probably wouldn’t have had another choice. I don’t think I would have loved the afters as much, but I am so in love with the shape and look of the dresser I wouldn’t have hated it even if I had to go to plan B.
At the end of the segment, Frank talked about trial and error. He could not have summed up DIY any better. This was my first staining experience, so I had nothing but error on my first attempt. I learned (google > some Home Depot advice *note: I’ve had great advice from Home Depot just not in this case) and retried. I got more than I expected from the finished the piece. Oh DIY sometimes I wish I could quit you, but then you go and get all pretty on me.
Anyway that’s my general advice/warnings on working with veneer and heck DIY projects in general. I tend to be more design minded than DIY meaning I buy for looks (the bones of a piece) then figure what the heck I need to do to it. Now with all this being said I would much rather have a solid wood piece, but sometimes that’s not possible (budget, availability, etc.).


ElseWhere FaceBook | Twitter | Instagram | Pinterest