After you’ve made your piping, it’s time to cut and sew the pieces of your seat cushion.

Lay your cushions on your ironed fabric. Flip it over and check to make sure you like how the pattern is arranged on the cushion. Outline your cushion with a fabric marker. Mark 3/4″ for your seam allowance.

Cut your fabric along your 3/4″ marks. You now have the top of your seat cushion. Iron it again with heavy starch to get all the wrinkles out.

Pin your piping with the cording facing in.

When the piping mets at the back of the cushion, leave it open about an inch for each side (start and finish). You can stick a pin in sideways where my fingers are as a reminder to leave those pieces alone. You will deal with them after you sew your piping around.

Use your zipper foot and sew as close to the cord as possible. *Remember to leave yourself an inch of piping from where you start sewing.* Pivot (with your needle in the fabric) around the corners of the cushion.

(I know I seriously need a manicure. Just don’t look at my hands. Please.) You’ve sewn to the back of cushion where the piping meets and needs to come together smoothly. Use a seam ripper to open up the piping on both ends.

Peal back the bias. Overlap the cord and cut it.

Tape the cord with masking tape. I have a ton of Frog Tape, so that’s what I used. Bonus it matches the fabric.

Do some folding. Fold one side under. Overlap the other piece of bias and slightly fold that under, so it looks like the picture above. Pin it and sew that final piece of piping down.

Your cushion will look like this after you’re done (except the back will be sewn). Don’t ask me how I did this twice and managed to not get a picture of the cushion at this stage.

Now it’s time to work on the bottom piece. I measured 4 inches and cut 3 strips. If you are using fabric with a large scale pattern, you should mark your fabric according to this tutorial. If you have a fabric with a floral pattern or a solid color, it doesn’t really matter since there isn’t a obvious repetition that will look weird if it doesn’t match up from the top cushion to the bottom piece.

Measure around your cushion to determine the length your strip needs to be. Add a 2″ seam allowance (1/2″ for your 4 ends). Mine needed to be 68 1/4″ finished, so my pieces needed to add up to 70 1/4″. My fabric was 56″ wide, so I cut 14 1/4″ piece from 1 of my strips. Pin the right sides together with 1/2″ seam allowance and sew. Press the steam down.

Pin the bottom piece with the right side down. Make sure your short strip is at the back of the cushion. Pin it 1/2″ from the piping. Sew it as close to the piping as possible. (This is more difficult that sewing the piping to the top piece. Be patient. Pivot around the corners.)

Clip around the corners, but don’t clip your stitch. This will make the fabric lay flat.

Flip your bottom piece down. You are ready to move your seat cushion to your chair!
Here are some great tutorials on sewing with piping: Make It Love It, Design Sponge, and Sew4Home.
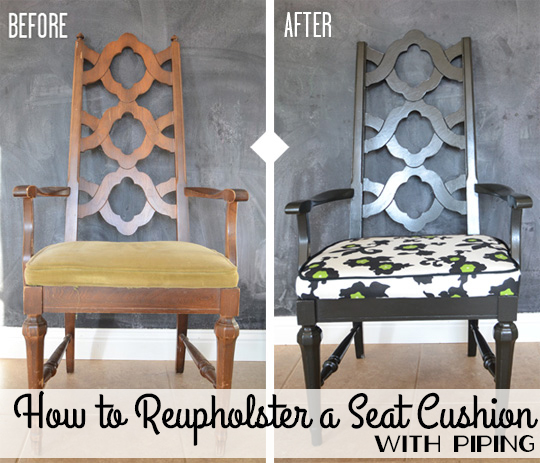
Click to read tips for the final step of reupholstering your seat cushion!


ElseWhere FaceBook | Twitter | Instagram | Pinterest