
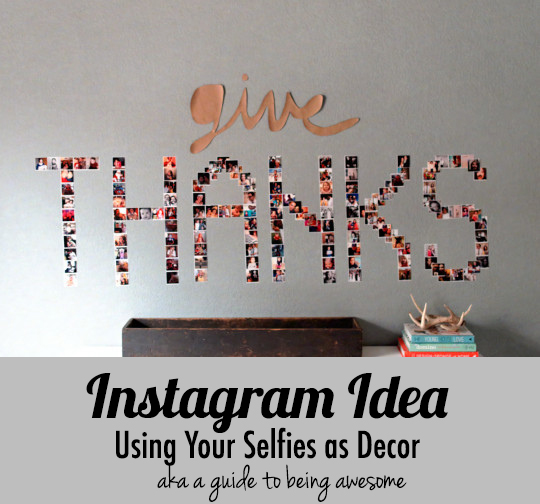
Today is the first installment of Dare to DIY Wills Casa Style. The challenge was to create a Thanksgiving project to remind you to be grateful during the season. I started thinking about what I am thankful for and how I could remind myself of those things throughout Thanksgiving. I decided to create a collage (similar to this and this) with lomo style photos to spell THANKS.
I bounced the idea off Nick. At first he made a stink face (although he vehemently denies it now). He did get behind the idea very quickly. Added bonus I woke up from my morning to sleep in (glorious morning), Nick had created this sketch to plan out the sizing and amount of photos required to pull off the project.

Graph Paper. Nerding out. DIY planning at its finest. There was more math and measurement done than I thought. Each square is one 2×2 photo. The photo size was determined after we realized if they were any bigger it would be too large for the space. We needed 123 photos to spell THANKS. It would be 70 inches long and 20 inches high.

I got right to work pulling pictures off instagram and facebook into a photoshop template Nick created. Those ridiculous photos are from an 80s party, so that makes them a little more normal right? I copied, pasted, and resized photos all night until I had 21 different jpeg files to send to Walmart to print.

Even when you tell Walmart to leave your photos alone, they don’t. The pictures were very saturated which we expected and actually wanted. Thanks for putting a new filter on our photos Walmart.

The bummer thing about getting the pictures from Walmart is they stretched the photo. Basically the white space between the photos was no longer even. Not a terrible thing, but it was annoying that I had to cut off most of the white border around the pictures to make them even.

We laid the pictures out via our graph. The left is a picture of what the S looked like creating it strictly from the graph. It was too pixellated for me. It made THANKS a little more difficult to decipher since the ANKS all had the same problem. We had more pictures printed out to layer them around the letter curves to make it a smoother transition.

We measured and used a level to define our space at the top and bottom before we started taping 123 photos up.

I put painters tape on the back of the photos while Nick hung them up. The space between each letter was 1 photo, so spacing the letters was pretty easy.

Here’s a close up of the layering on the K. I know it cuts off the pictures below. But if we are honest with ourselves, this is really just a shrine to Ramona. She is already obsessed telling us the back story of each photo.

We wanted to add a lovely cursive give to the top of our THANKS. I begged Nick to find a cool handwritten font for me to trace on butcher paper, but he said no. Poor guy had really done enough at this point anyway. He thought it would be pointless to find a handwritten cursive when I could actually hand write give in cursive. Touche baby.

Go check out other Dare to DIY projects for our hosts Decor and the Dog, Maybe Matilda, Newly Woodwards, and Two Twenty One. The link up party will be on the home page of any of the host sites.
Make sure to stop back by tomorrow for a GIVEaway. It may or may not have to deal with our Saturday at West Elm in Dallas with some blog superstars.
**UPDATE: See how we carried photos into Christmas.


HOLY COW! I’m seriously DYING over this project. What an amazing reminder of all the moments and people to be thankful for. Totally impressed with this project. Awesome job and I’m so thankful to you for linking up to Dare to DIY this week.
Thanks Kim! It turned out better than we expected. I’m kinda in love with it. I might move it somewhere after this is all over.
What a cute idea! Looks like a lot of work, but I love the finished wall.
That’s so sweet that your husband helped!
Thanks! Yes thank goodness he helped. I don’t think I could have made it passed the planning stage. I didn’t realize how much thinking (and math) was need for the layout. It took us about 2 hours to get it on the wall. Not that bad when you are talking with your husband.
Hey dude, I’m part of this blog too…
You just can’t tell because I never post
This is such a cool focal point for the holiday!
Stopping by from Dare to DIY
Thanks! My daughter might want her shrine to be moved to her room after this is all over. Might put it in a hallway if she can keep her hands off. 😉 Thanks for stopping by.
Wow – This looks so awesome!! I am jealous
Thanks! You should do it! It really isn’t that difficult once all the prep is done. Even the prep isn’t bad. Who doesn’t like looking at old photos?!
Okay – I was looking again and just noticed your dining chairs! Holy awesome batman! Seriously. Going now to stalk the rest of your blog
Ha! Please do. The chairs are my favorite project so far. We put a tutorials and projects tab on the menu bar for easy stalking! 😉
WOW! This is so awesome! How long did it take you to put all of the photos up? I’d never want to take them down!
It took about 2 hours to put the photos up with both of us working on it. The longest part was getting the photos into the template. You can do that while you watch tv, so it’s not too bad. I think it took me 3 hours for that part. Luckily pulling photos from instagram and facebook isn’t difficult and makes the process a lot quicker.
WOW this is terrific! LOVE it!!! What a great idea. Looks fantastic!
Thanks so much! I loved your acorns! They are seriously amazing.
I agree with Caitlin, I’d never want to take it down! What a great idea!
Ok, ok I’ll leave it up! 😉 I was secretly going to anyway. I guess it’s not much of a secret since I have a blog.
this is really amazing! it’s so pretty i vote it should stay up past the season! my husband also gives me the stink eye often when i suggest projects!
and i love that you got some planning help
Haha good to know I’m not the only victim of stink eye! He is typically the one who comes up with design plans or we arrive at a plan by talking through things. I count this as a major win for me since it was ALL my idea. Admittedly I couldn’t have pulled it off without him though.
I like to think of myself as more of a thinker than a doer
Holy moly woman, this is really really cool! What an awesome idea, first up. And the execution is so cool . . . I mean, a big thanks would have been cool, but a big thanks out of family pictures is even amazinger. You did a great job! I love it!
Haha thanks Rachel! We are stoked about the outcome too! Much more awesome than we expected.
WOW!!! this is AMAZING! and how the heck have i never been here? i LOVE your chairs, love it all! i am off to explore your talents!
Haha don’t worry not a lot of people have been here! We’ve only been blogging for about 10 months, and we are just starting to get out there! Hope you find more stuff you love!
New reader from the Blog Party!! I LOOOVVEE this project! It gives me warm fuzzies. What an amazing way to remind yourself of all of the reasons you’re thankful.
Thanks so much! It is a great reminder. Also you can’t miss it because it’s pretty big.
Ummm, you have the patience of Saint. I would have quit after the “T”. This is seriously amazing. Way to take the challenge and run with it!
If we didn’t have the graph, I would have quit for sure. It would have been beyond frustrating. Thanks for the challenge or I wouldn’t have ever motivated myself to do it!
Wow, this is adorable!! I think I would want to keep it up all year round (Stopped by from the Dare to DIY link-up btw!)
Elisabeth@Simply Parkers
Thanks Elisabeth! My daughter really loves it. She could spend hours looking at pictures of herself! Oh the joys of being 3!
I wondered what you were going to come up with when I saw your Instagram pic. This is great! Such a cool idea! And I love the nerdy graph paper– definitely under-utilized in DIY projects, in my opinion. Thanks for linking up!
You could do this so easily with all your awesome Instagram photos. I did not include a Channing Tatum picture, but maybe I will add one just for you! 😉 I’m sure Nick would appreciate that!
I L-O-V-E love this project. In fact Iwould love to do it with the word love
Haha! DO IT!!
Pingback: 10 DIY Holiday Decor Ideas to Deck the WALLS |
Pingback: Falling for DIYs
Pingback: DIY Wishbone Napkin Rings | Wills CasaWills Casa